
Drumroll, please, a drumroll that sounds like Matador by Los Fabulosos Cadillacs, drumroll here! 🥁
Dónde estás Matador, the YAML is looking for you
We’ve finally reached the part we really like, well, the part I like, let’s get to work. In the two previous posts (the basics and what a Pod really is) we saw a lot of theory, and believe me it wasn’t in vain, but today we’re going to create our first Pod and actually use K8s. And while we’re at it we’re going to break it on purpose MUAHAHAHA, because that’s how you really learn 😈
Before we start, what you need 🧰
But first, to create anything in K8s we need two tools:
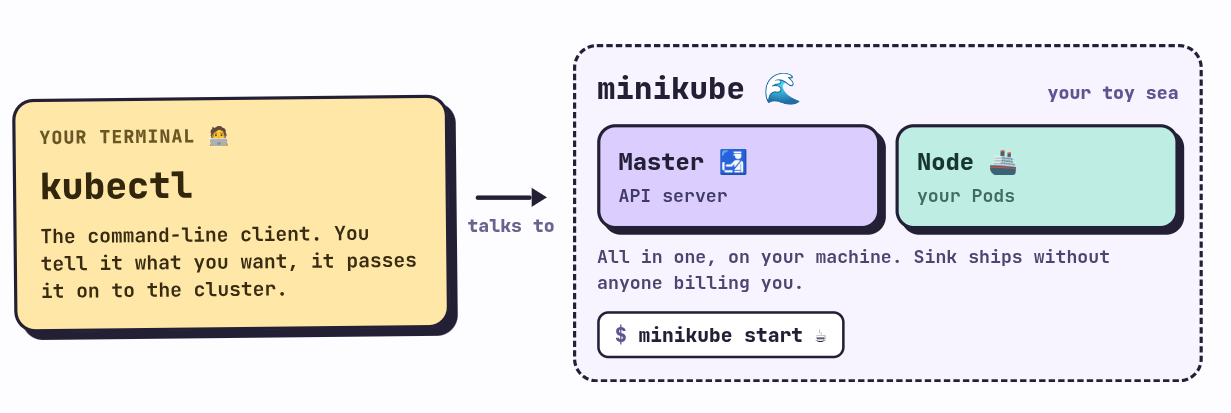
- kubectl, the command line client. It’s the one that talks to the master’s API server, the one we saw in the first post as the “customs house” everything goes through. You tell it what you want, and it passes it on to the cluster. Remember the previous posts, please
- minikube, which spins up a complete K8s cluster on our own machine (a master and a node packed into one, usually inside a container or a VM). It’s our toy sea 🌊, one where you can sink ships without anyone charging you for it, yes, I’m talking to you, AWS and Google Cloud.
If you don’t have them installed, here are the official guides for kubectl and minikube, if not, watch some YT or TK tutorials 👻. Once you have them installed, we start the cluster:
minikube startIt takes a little while the first time because it has to download stuff, go get a coffee ☕ or a mate 🧉
Our first Pod 🫛
We’re going to use the kubectl run command, which is the fastest way to create a Pod. Run this in your terminal:
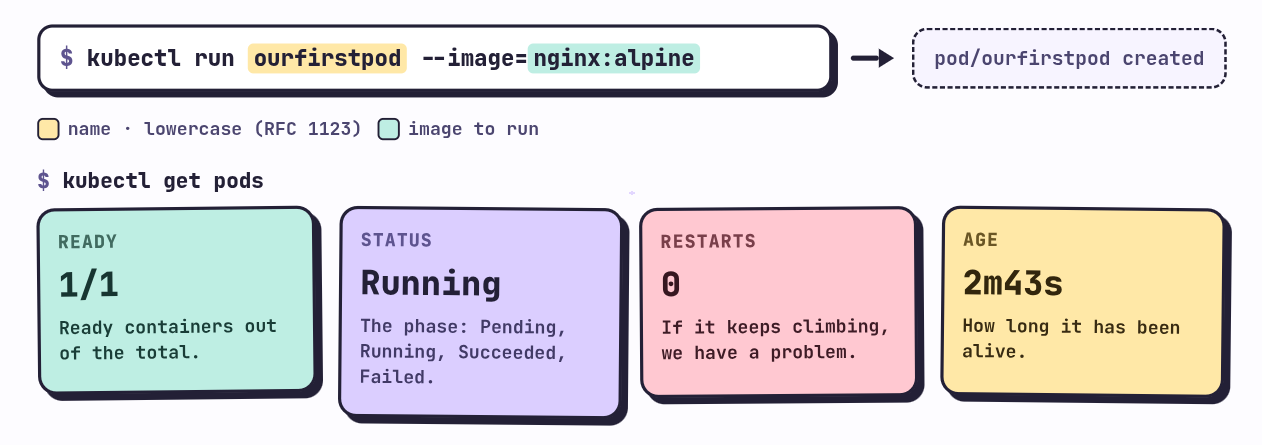
kubectl run ourfirstpod --image=nginx:alpineAnd you’ll see that the terminal output is similar to this:
pod/ourfirstpod createdOkay, but what exactly does this command do? If we go to the documentation, the syntax is something like this:
kubectl run NAME --image=image [--env="key=value"] [--port=port] [--dry-run=server|client] [--overrides=inline-json] [--command] -- [COMMAND] [args...]We only pass it two things: the name of the Pod (ourfirstpod) and the image we want to run (nginx:alpine, which is nginx on top of Alpine Linux, a really tiny and minimalist Unix image, google it for more info). Everything else is optional.
One detail we should keep in mind, if we look closely, we wrote the whole name in lowercase. It’s not my whim, K8s follows RFC 1123 for names, which only allows lowercase letters, numbers, hyphens and dots. If you try to create a Pod called ourfirstpod-Nginx, K8s rejects it right to your face, no anesthesia. It happened to me more than once, in case it’s any consolation 😅, I’m team #CamelCase, but I can’t here 🙄.
Is it running?
To see our Pods we use:
kubectl get podsNAME READY STATUS RESTARTS AGE
ourfirstpod 1/1 Running 0 2m43sNice, everything’s fine! It’s Running. But this output has more information than it seems, let’s go column by column to see what each thing means:
- READY: how many of the Pod’s containers are ready out of the total it has.
1/1is one container ready out of one container,1/2would mean something is wrong with one of the two (spoiler alert! ⚠️, we’ll see it live later on). - STATUS: what phase of its life the Pod is in. It can be
Pending(waiting to be assigned to a node or for the image to download),Running,SucceededorFailed(the last two for things that run and finish), and error reasons likeErrImagePullorCrashLoopBackOffalso show up, which we’ll get to know soon. - RESTARTS: how many times K8s has had to restart a container of the Pod. If this number keeps going up and up, we have a problem.
- AGE: how long it has been alive.
Looking at a Pod in detail 🔍
Well, we already know how to create a Pod and see if it runs, but that’s barely the surface. As good devops we always have to go further, and for that nothing beats a hypothetical case: what happens if we ask K8s for an image that doesn’t exist? I don’t know, nginx:rivaldito 😌
kubectl run oursecondpod --image=nginx:rivalditopod/oursecondpod createdIf you look at K8s’s outputs, it tells us it created it with no problem. And it makes sense, since K8s accepts your request (the Pod “exists” as an object in the cluster) and only afterwards tries to pull the image. It’s like ordering a taxi to an address that doesn’t exist, the taxi leaves anyway and only when it arrives does it realize.
Now let’s see how our Pod is actually doing:
kubectl get podsNAME READY STATUS RESTARTS AGE
ourfirstpod 1/1 Running 0 45m
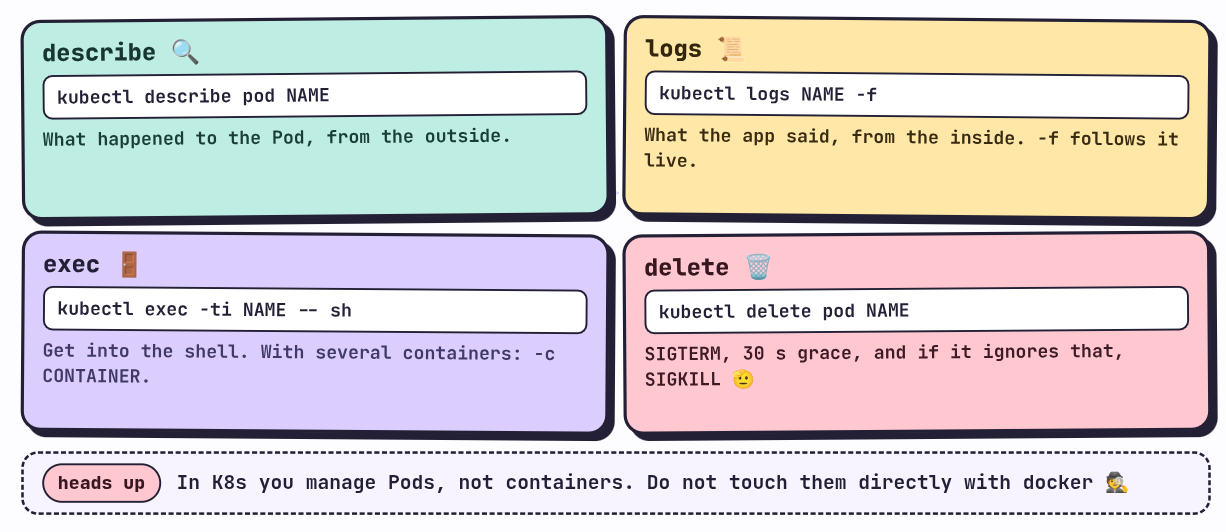
oursecondpod 0/1 ErrImagePull 0 9sErrImagePull. Okay, it seems not everything is fine like we thought, K8s is already giving us a hint, but it doesn’t tell us the whole story. Well, for these situations the describe command exists, and if we run it:
kubectl describe pod oursecondpodThe output is super long (I trimmed it a bit so as not to make this post too long, but I invite you to run it yourself and see the whole terminal output):
Name:             oursecondpod
Namespace:        default
Node:             minikube/192.168.49.2
Labels:           run=oursecondpod
Status:           Pending
IP:               10.244.0.6
Containers:
  oursecondpod:
    Image:          nginx:rivaldito
    State:          Waiting
      Reason:       ImagePullBackOff
    Ready:          False
    Restart Count:  0
...
Conditions:
  Type                        Status
  PodReadyToStartContainers   True
  Initialized                 True
  Ready                       False
  ContainersReady             False
  PodScheduled                True
...
Events:
  Type     Reason     Age                  From               Message
  ----     ------     ----                 ----               -------
  Normal   Scheduled  2m56s                default-scheduler  Successfully assigned default/oursecondpod to minikube
  Normal   Pulling    83s (x4 over 2m55s)  kubelet            Pulling image "nginx:rivaldito"
  Warning  Failed     82s (x4 over 2m53s)  kubelet            Failed to pull image "nginx:rivaldito": ... manifest for nginx:rivaldito not found: manifest unknown
  Warning  Failed     82s (x4 over 2m53s)  kubelet            Error: ErrImagePull
  Normal   BackOff    4s (x11 over 2m53s)  kubelet            Back-off pulling image "nginx:rivaldito"
  Warning  Failed     4s (x11 over 2m53s)  kubelet            Error: ImagePullBackOff
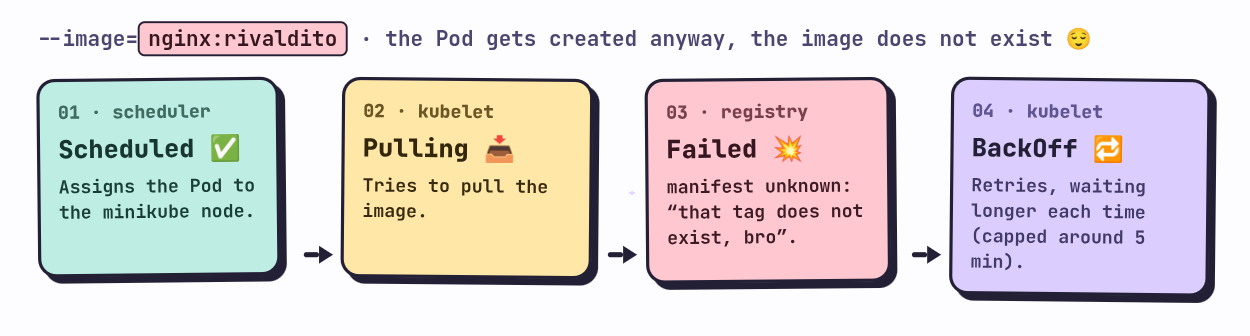
There are plenty of things here that we’ll go through in future posts (the Conditions, the QoS, the Tolerations, the Volumes…), but the part that interests us right now is the last one, Events, which is basically the K8s skipper’s logbook about the Pod, if we read it we see this:
Scheduled: the scheduler (you remember it from the first post, the one that decides which node each Pod lands on) assigned our Pod to theminikubenode. So far so good.Pulling: the kubelet of that node (the local foreman) tries to download thenginx:rivalditoimage.Failed: the download fails, and the message is crystal clear,manifest unknown. The image registry is telling us “that tag doesn’t exist, brother”.ErrImagePullandImagePullBackOff: the kubelet retries, but not like crazy. Between each attempt it waits longer (the famous back-off, which keeps growing up to a cap of about 5 minutes) so it doesn’t bombard the registry. That’s why you see thex4 over 2m55s, those are the accumulated attempts.
And watch out for this, ErrImagePull is the error at the moment of failure, and ImagePullBackOff is the “I’m waiting to try again” state. They’re two sides of the same thing in the K8s cycle, and you’ll see the STATUS switch between one and the other.
Homework: Yes, I turned into a teacher, but that’s how you learn, now run a describe on our first Pod, the one that didn’t fail, and compare the events. You’ll see the story of a Pod that did go well: assigned, image downloaded, container created, container started.
Deleting Pods 🗑️
We already know how to create, we already know how to see if it runs and even read its life history, but everything has its end, so it’s time to learn how to delete. It’s super easy:
kubectl delete pod oursecondpodpod "oursecondpod" deleted from default namespaceYou can pass several names separated by spaces (kubectl delete pod one two three). A fun fact: if you were quick and deleted a healthy Pod, you’ll notice it takes about 30 seconds to disappear. It didn’t hang, it’s that K8s kindly tells the container it’s about to be shut down (a SIGTERM signal), gives it 30 seconds of grace to wrap up its things, and if it doesn’t obey, it shuts it down by force (SIGKILL). Polite but firm, that’s K8s 🫡
And where is the container? 🕵️
Let’s do an exercise that’s going to be very obvious, but I don’t like leaving anything to assumption. I’m going to assume you use Docker as your runtime, since it’s the “common” one in the industry. With our ourfirstpod running, run:
docker psIf you used minikube with the Docker driver (the most common), you’ll see a single container called minikube. And nginx? Well, it’s inside, because that container is our K8s node. Let’s go take a look:
minikube ssh
docker ps
Now yes, there’s our nginx:alpine, with a kind of weird name like k8s_ourfirstpod_ourfirstpod_default_.... And if you look closely, another one also shows up with a name that starts with k8s_POD_... that runs an image called pause. Sound familiar? It’s the invisible container from the previous post that holds the Pod’s namespaces. 😎
(If your minikube uses containerd instead of Docker, the equivalent command inside the node is sudo crictl ps.)
Now, the point of the exercise, since I got a bit sidetracked. The container exists, yes, but in K8s we manage Pods, not containers. If you go and shut down or modify that container directly with Docker, K8s doesn’t find out about what you did (or worse, it finds out and restarts it, or it gets confused about the state) and you can get yourself into considerable trouble. Containers are an implementation detail of the node, the cluster manages them, you don’t, as a rule, you should forget about Docker when using K8s in deployments unless it’s really necessary.
So, how do I get into a container?
Very logical that you’d ask that “if I can’t use Docker, how the F$%#$%@ do I get into a container’s console?”. K8s has its own equivalent, kubectl exec:
kubectl exec -ti ourfirstpod -- shThe -ti gives you an interactive terminal, and the -- separates kubectl’s flags from the command you want to run inside (in this case sh). Since our Pod has a single container, K8s knows which one to get into. When we have several in the same Pod we’ll use -c container-name to choose, and in fact we’re going to need it further down.
Viewing the logs 📜
Just as important, or more: the logs. When something fails in a Pod, 9 times out of 10 the answer is there.
kubectl logs ourfirstpod -fThe -f (for follow) leaves the terminal “stuck” showing the logs live, like the good old tail -f. Without it, it only shows you what’s there so far and it’s over. Between describe (what happened to the Pod from the outside) and logs (what the application said from the inside) you have 90% of K8s debugging covered.
YAML manifests 📜
So far we’ve created things by firing off commands, which is great for learning and for quick tests. But in real life almost nobody creates infrastructure like this. What’s used are manifests, YAML files that describe what we want to exist in the cluster.
Before explaining what a manifest is, we can see it with our own eyes. Ask K8s for the YAML of our first Pod:
kubectl get pod ourfirstpod -o yamlTry it! You’ll see a gigantic output. Well, that’s basically the Pod object just as K8s stores it internally. When you ran kubectl run, kubectl put together a description like that for you (much smaller, the fat part was filled in by K8s with default values and with the current state) and sent it to the API server. So that YAML was always there, behind the scenes, and kubectl run was just a shortcut so you didn’t have to write it 🎭
Why YAML and not commands?
Let’s imagine we have to deploy a service with five containers, three replicas, certain ports, environment variables, memory limits and a bunch of other stuff… With loose commands you’d have to remember every flag and repeat it every time something fails or you want to set it up in another cluster. This is really unfeasible, and prone to human error.
Behind this there’s an important idea, the difference between two styles:
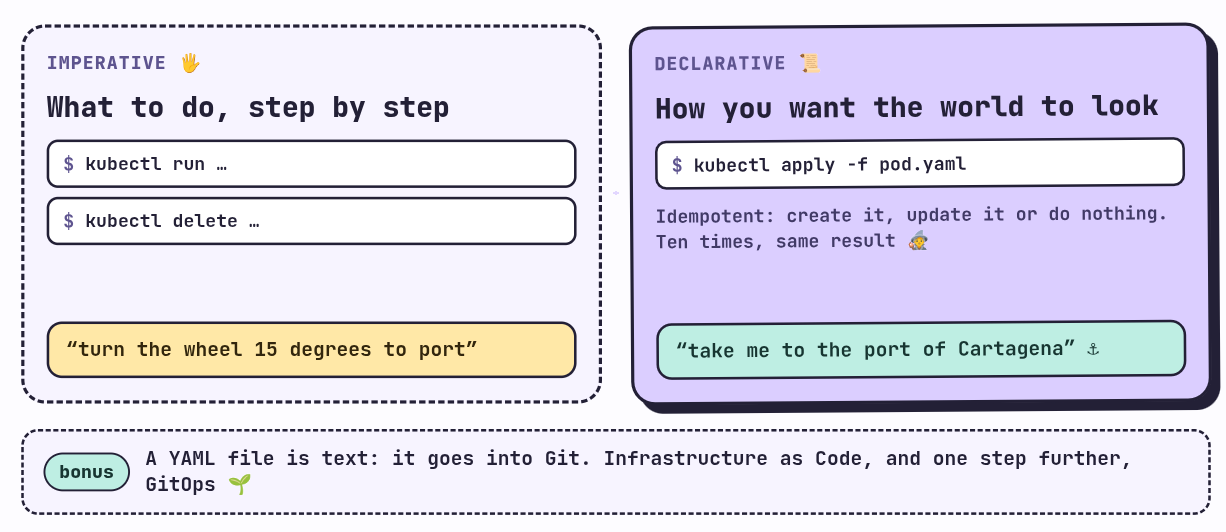
- Imperative: you tell K8s what to do, step by step. “Create this Pod.” “Delete that other one.” It’s what we did with
kubectl runandkubectl delete. - Declarative: you tell K8s how you want the world to look and let it take care of getting there. “I want these two Pods to exist with this configuration.”
Manifests are the declarative style, and it’s the heart of K8s. What we always aim to do is describe the desired state, K8s compares it with the current state, and if they don’t match, it acts until they’re equal. If you remember the first post, that back and forth is precisely the master’s job (the API server stores what you want, and the controllers spend their lives comparing). A sea analogy, we don’t tell the captain “turn the helm 15 degrees to port”, you tell him “take me to the port of Cartagena” and he decides how, this is what we’re after.
And there’s a huge bonus in all this, the one that convinced me the most, a YAML file is text, so you can put it in Git. You have a history of every change, who made it, when, and you can go back if something blows up. With loose commands in the terminal, that’s way harder, because your “documentation” is your bash history and the memory of whoever was on call. This, by the way, has a name (Infrastructure as Code), and taken a step further (having the cluster sync itself with what’s in Git) it’s called GitOps. I’m just leaving the little seed 🌱 for you to look into!
Our first manifest
Open a terminal and create a file called pod.yaml. (I set up a GitHub repository with everything we did in this post, in case you prefer to download it instead of copying and pasting.)
Where do we get the content from? There are several ways:
- Copy the output of
kubectl get pod ourfirstpod -o yamland clean it up (very educational, but it’s a lot of noise). - The didactic one: search Google for “kubernetes pod” and go to the official Pods documentation, which has a simple example.
- The third one (hahaha): ask an AI. It works well, but it makes things too easy for you, and when you’re learning something it’s good to suffer a little.
There’s a fourth one that I really like, and it’s asking kubectl to generate the YAML for you without creating anything:
kubectl run nginx --image=nginx:1.14.2 --dry-run=client -o yamlThe --dry-run=client means “simulate, don’t actually create anything”, and -o yaml prints what it would have sent. It’s an everyday trick, because it gives you a clean skeleton to edit.
But in this case let’s use the one from the documentation, which is this:
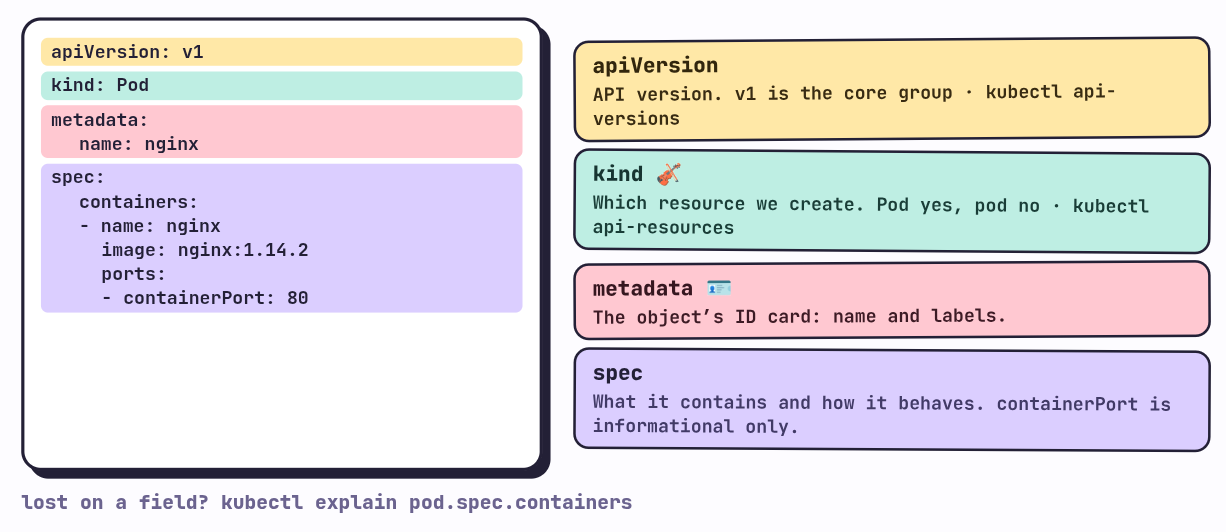
apiVersion: v1
kind: Pod
metadata:
  name: nginx
spec:
  containers:
  - name: nginx
    image: nginx:1.14.2
    ports:
    - containerPort: 80
Copy it into your pod.yaml and let’s break it down line by line.
apiVersion
It tells K8s which version of its API we’re talking about. For Pods it’s v1. And how do we know which value to put? By asking the cluster:
kubectl api-versionsadmissionregistration.k8s.io/v1
apiextensions.k8s.io/v1
apiregistration.k8s.io/v1
apps/v1
authentication.k8s.io/v1
authorization.k8s.io/v1
autoscaling/v1
autoscaling/v2
batch/v1
certificates.k8s.io/v1
coordination.k8s.io/v1
discovery.k8s.io/v1
events.k8s.io/v1
flowcontrol.apiserver.k8s.io/v1
networking.k8s.io/v1
node.k8s.io/v1
policy/v1
rbac.authorization.k8s.io/v1
resource.k8s.io/v1
scheduling.k8s.io/v1
storage.k8s.io/v1
v1It’s the list of all the API versions our cluster understands. Notice they have the form group/version, and that the last one, v1, has no group. That’s the “core group”, the one for K8s’s most basic resources (Pods, Services, Namespaces…). The rest got organized into groups over time, like apps/v1 (where Deployments live, which we’ll see soon) or batch/v1 (for Jobs). That’s why a Pod takes v1 and not batch/v1, careful not to mix them up.
kind
What type of resource we want to create. K8s is an orchestrator, and like every good orchestra conductor it directs an infinity of instruments 🎻. To see all the ones it knows how to handle:
kubectl api-resourcesI’m not pasting the output because it’s super long, look at it yourself, go aheaaaad 😏. You’ll see a table with the name, the API group and the KIND of each resource, which is exactly the value that goes in this field. Names are case sensitive: Pod yes, pod no.
metadata
The object’s “ID card”: its name and, optionally, labels and other data. For now we only care about name, which is the name the Pod will have. We’ll leave labels for further down, you’ll see.
spec
The specification, that is, what we want the resource to contain and how it should behave. Each kind has its own spec. In the case of a Pod, the main thing is the containers list, and each container has its name, its image and, optionally, its ports. Notice the dash (-) before name: in YAML that means “list item”, and it’s the way of saying that we could put more containers here.
About containerPort: it’s informative. It documents which port the application listens on, but it doesn’t open or block anything. If you put 8080 and nginx listens on 80, nginx will keep listening on 80 and K8s doesn’t even flinch. Keep this in mind, because it’s going to be useful in a bit.
If you ever get lost with a field, K8s has its own manual in the terminal:
kubectl explain pod.spec.containersIt works with any field, and it’s my salvation when I have no internet or I’m too lazy to open the documentation.
Et voilà, our first manifest! To apply it:
kubectl apply -f pod.yamlAnd if you want to delete it:
kubectl delete -f pod.yamlThe beauty of apply is that it’s idempotent: you can run it ten times and the result is the same. If the Pod doesn’t exist, it creates it. If it already exists and you changed something in the YAML, it updates it. If nothing changed, it does nothing. That’s the declarative magic, you describe, K8s figures it out 🧙.
That’s why the title of this third chapter is “The manifest as a way of life”
Several Pods in a single file
Now, the good part: if we want to create many Pods, we no longer need to run kubectl run a thousand times. We can put several resources in a single file, separating them with three dashes (---):
apiVersion: v1
kind: Pod
metadata:
  name: nginx
spec:
  containers:
  - name: nginx
    image: nginx:1.14.2
    ports:
    - containerPort: 80
---
apiVersion: v1
kind: Pod
metadata:
  name: nginx2
spec:
  containers:
  - name: nginx2
    image: nginx:1.14.2
    ports:
    - containerPort: 8080
A single kubectl apply -f pod.yaml and both are born. And as we said, we also have the history of how everything was created and managed, something that’s quite a bit harder to have with just the command line.
Several containers in a Pod 🫛🫛
Remember what we saw in the previous post: a Pod can have several containers that share a network. This is useful when a service needs another one to accompany it closely (the sidecar pattern). Let’s try it with an experiment.
We’ll use the python:3.12-alpine3.24 image and a very handy Python feature, http.server, which spins up a web server with a single line. Each container is going to write its name into an index.html and serve it on port 8080:
apiVersion: v1
kind: Pod
metadata:
  name: pythonservers
spec:
  containers:
  - name: pythonserver1
    image: python:3.12-alpine3.24
    command: ['sh', '-c', 'echo cont1 > index.html && python -m http.server 8080']
  - name: pythonserver2
    image: python:3.12-alpine3.24
    command: ['sh', '-c', 'echo cont2 > index.html && python -m http.server 8080']
Notice the command field, which overrides what the image would run by default. We create it with kubectl apply -f and see what happens…
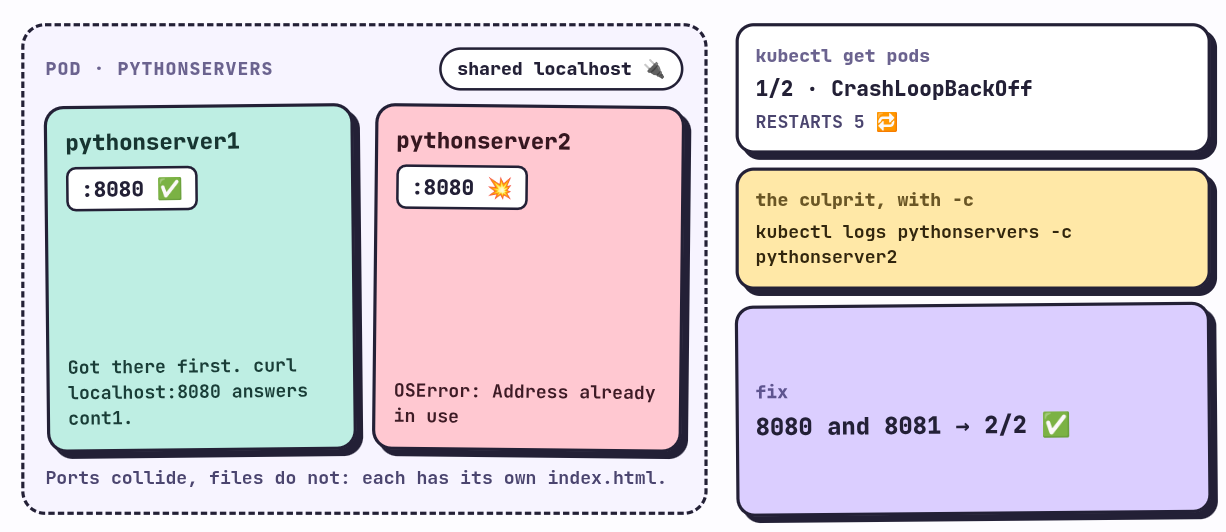
kubectl get podsNAME READY STATUS RESTARTS AGE
pythonservers 1/2 CrashLoopBackOff 5 (2m30s ago) 5m22sHmmm. It was created, but something smells off. READY 1/2 (one of the two containers is down) and a new and fearsome status: CrashLoopBackOff, which means the container starts, dies, K8s restarts it, it dies again, and so on in a loop, waiting longer and longer between restarts (does the back-off ring a bell?). The RESTARTS column confirms it: it’s already at 5 restarts.
By now you have all the tools to solve it on your own, so pause the post and give it a try before reading on. I’ll wait for you 🧘
…
Done? Let’s go together. First describe:
kubectl describe pod pythonserversEvents:
...
Warning BackOff 65s (x12 over 7m59s) kubelet Back-off restarting failed container pythonserver2 in pod pythonservers_default(913ee761-...)It tells us pythonserver2 is failing, but it doesn’t tell us why. Events tell you what K8s tried, not what the application said before dying. That’s what logs are for, and now we have two containers, so we have to tell it which one with -c:
kubectl logs pythonservers -c pythonserver1The output is empty, and that’s a good sign: server 1 is running quietly (the Python server only writes when someone makes a request to it). Now the second one:
kubectl logs pythonservers -c pythonserver2Traceback (most recent call last):
...
OSError: [Errno 98] Address already in useThere’s the culprit! Address already in use, port 8080 is already taken. (And by the way, a mistake of mine that you’ll surely make too: I first tried kubectl logs pythonserver2 and got pods "pythonserver2" not found, because that’s the name of the container, not the Pod. The Pod is called pythonservers, the container goes with -c.)
Let’s check it from the inside
Don’t take my word for it, let’s see it with our own eyes. Let’s get into the container that is alive:
kubectl exec -ti pythonservers -c pythonserver1 -- shOnce inside, let’s ask port 8080 on localhost for something. Alpine comes with wget out of the box (via busybox), but if you prefer curl you can install it with Alpine’s package manager, apk:
apk add curl
curl localhost:8080cont1It answers cont1. And here comes the interesting part: we talked to localhost, and the server of container 1 answered us, but container 2 also tried to use localhost:8080 and crashed. Why? Because we already know what the containers of a Pod share: the network namespace. For both containers, localhost is the same, they have the same IP and the same port table. It’s exactly like what happens on your computer when you try to start two programs on the same port, the second one to arrive is left without a chair 🪑
(And this confirms something we said in the previous post: the Mount is not shared. Both containers wrote their own index.html, but each in its own file system, without stepping on each other. Ports do step on each other, files don’t.)
The solution is simple: have each container use a different port, for example 8080 for one and 8081 for the other. Try it, change the manifest, apply it again, and watch it go to 2/2. (One detail: Pods are quite immutable, so if apply complains about you trying to change certain fields, delete the Pod with kubectl delete -f and create it again.)
Labels 🏷️
Changing topics, let’s talk about labels. They’re, basically, metadata in the form of key-value pairs that you stick on a resource to be able to identify and group it. What for? Suppose you have three almost identical Pods, but one is production and two are staging. How do you tell them apart? With labels.
Labels are arbitrary, you can make up whichever you want, but there are some that are almost universal in the community, like app (which application it belongs to) and env (which environment it runs in). Let’s use them:
apiVersion: v1
kind: Pod
metadata:
  name: nginx
  labels:
    app: frontend
    env: development
spec:
  containers:
  - name: nginx
    image: nginx:1.14.2
    ports:
    - containerPort: 80
---
apiVersion: v1
kind: Pod
metadata:
  name: nginx2
  labels:
    app: backend
    env: production
spec:
  containers:
  - name: nginx2
    image: nginx:1.14.2
    ports:
    - containerPort: 8080
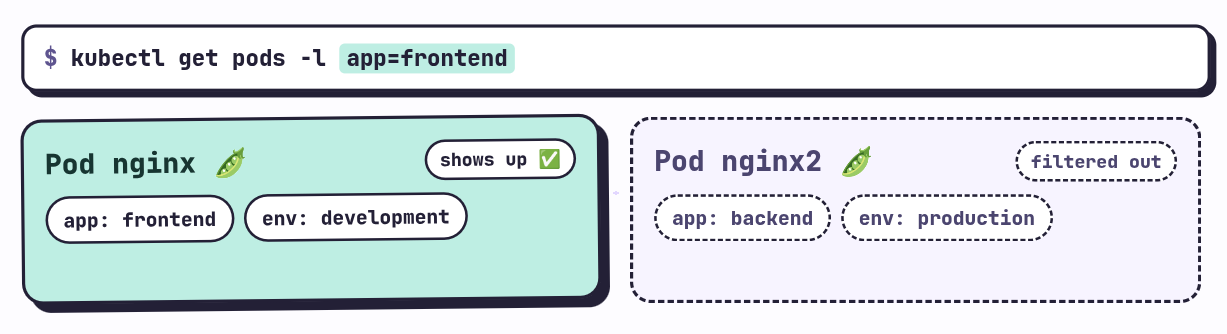
We apply them with kubectl apply -f, and now, if I want to filter only certain Pods, I use the -l flag (for label) on the get:
kubectl get pods -l app=frontendAnd only the Pod that matches shows up. You can also combine filters separated by a comma (-l app=backend,env=production) and see everyone’s labels with kubectl get pods --show-labels.
This looks like a minor detail now, but labels are the glue of K8s. Later you’ll see that Services, Deployments and pretty much everything else find “their” Pods precisely by looking for labels. Keep this idea, it’s one of the important ones.
The problem with loose Pods 😬
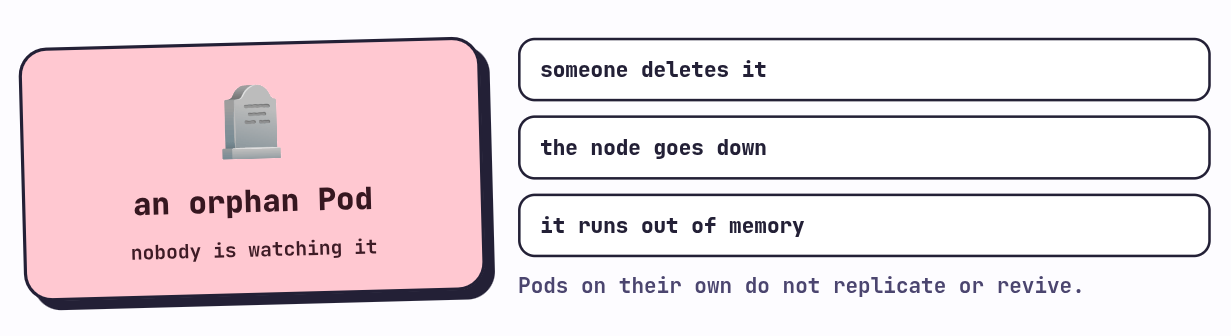
And now the part where I take away your illusion. Everything we did today was didactic, but it has a huge problem: a Pod created like this is an orphan.
Think about it. If I create a single Pod and someone deletes it (or the node goes down, or it runs out of memory), there’s no guarantee it will come back up. Nobody is watching it. And if I wanted to always have, at minimum, two replicas of my Pod running, how do I guarantee it? Pods on their own don’t replicate or revive. If they die, they die, and that’s where their story ended 🪦
This is probably the biggest problem of working with Pods directly, and K8s has an elegant solution for it. But that’s a topic for the next post, where we’ll meet the controllers that watch over and keep our Pods alive.
The song of the post
These past few days, with the release of La bola negra, I’ve been listening to a lot of Guitarricadelafuente and I have La nieve, the song from the movie, stuck in my head, on loop.
Mira que tonteria!!! 🥲